

How To Save An Imported Background Layer In Qgis
13.1. The Fashion Director
-
The Mode Director dialog
-
Organizing style items
-
Adding, editing or removing an item
-
Sharing mode items
-
Exporting items
-
Importing items
-
Using the Browser panel
-
Using the online repository
-
-
-
Setting a Colour Ramp
-
Creating a Legend Patch Shape
13.1.1. The Fashion Manager dialog
The Mode Manager is the place where you lot tin manage and create generic way items. These are symbols, color ramps, text formats or label settings that can exist used to symbolize features, layers or impress layouts. They are stored in the symbology-style.db database under the active user contour and shared with all the project files opened with that profile. Mode items can also be shared with others thanks to the export/import capabilities of the Style Director dialog.
You tin can open that modeless dialog either:
-
from the
 card
card -
with the
Style Manager push button from the Projection toolbar -
or with the
Way Manager button from a vector menu (while configuring a symbol or formatting a text).
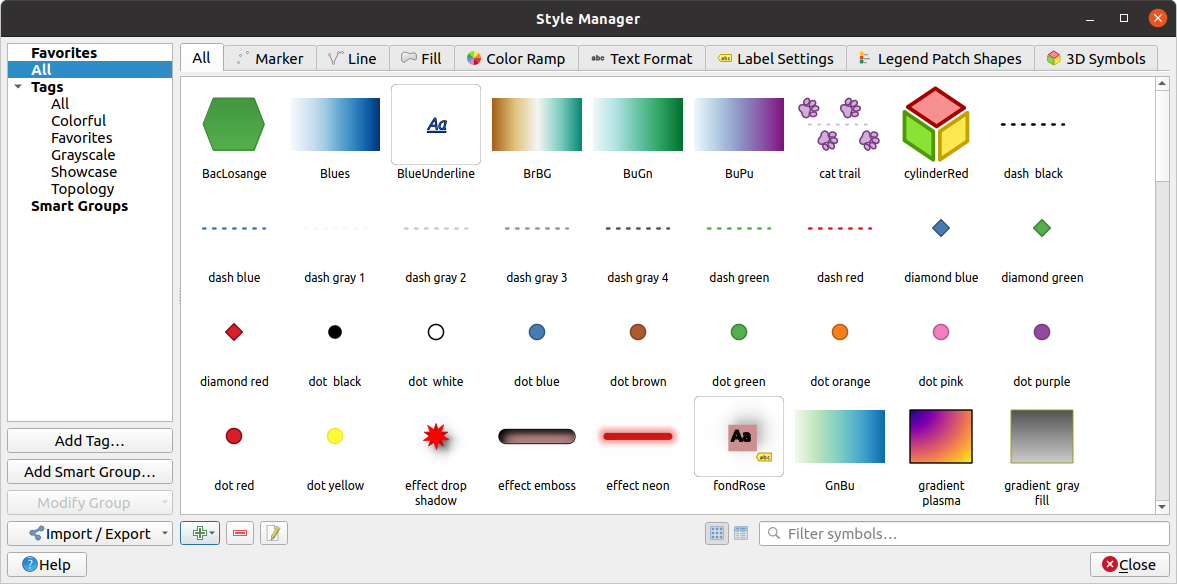
Fig. 13.1 The Style Manager
13.1.one.1. Organizing way items
The Style Manager dialog displays in its eye a frame with previewed items organized into tabs:
-
All for a consummate collection of point, linear and surface symbols and label settings besides as predefined colour ramps and text formats;
-
 Marker for signal symbols merely;
 -
 Line for linear symbols only;
 -
 Fill for surface symbols simply;
 -
 Colour ramp;
 -
 Text format to manage text formats, which store the font, color, buffers, shadows, and backgrounds of texts (i.e. all the formatting parts of the label settings, which for case can be used in layouts);
 -
 Label settings to manage label settings, which include the text formats and some layer-type specific settings such every bit characterization placement, priority, callouts, rendering…
 -
 Legend Patch Shapes to manage custom fable patch shapes, which include Mark, Line and Fill up geometries.
 -
 3D Symbols to configure symbols with 3D properties (extrusion, shading, distance, …) for the features to render in a 3D Map view
You can arrange the Styles in  Icon View or in
  List View on the bottom correct side. In both views the tooltip shows a larger case of the style.
For each family of items, yous can organize the elements into unlike categories, listed in the panel on the left:
-
Favorites: displayed by default when configuring an item, it shows an extensible ready of items;
-
All: lists all the available items for the active type;
-
Tags: shows a list of labels you tin can employ to identify the items. An item can be tagged more than one time. Select a tag in the list and the tabs are updated to bear witness only their items that belong to information technology. To create a new tag you lot could later attach to a gear up of items, use the Add Tag… button or select the
 Add Tag… from whatever tag contextual menu;
 -
Smart Group: a smart group dynamically fetches its symbols according to conditions set (see eg, Fig. 13.2). Click the Add Smart Grouping… button to create smart groups. The dialog box allows you to enter an expression to filter the items to select (has a particular tag, take a cord in its name, etc.). Whatever symbol, colour ramp, text format or characterization setting that satisfies the entered condition(s) is automatically added to the smart group.
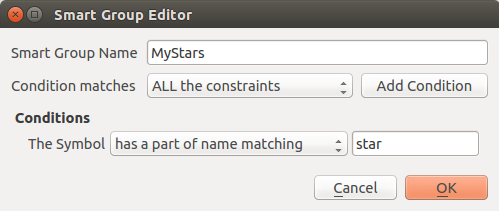
Fig. xiii.ii Creating a Smart Group
Tags and smart groups are non mutually exclusive: they are just two different ways to organize your style elements. Dissimilar the smart groups that automatically fetch their belonged items based on the input constraints, tags are filled past the user. To edit any of those categories, yous can either:
-
select the items, right-click and choose and and so select the tag name or create a new tag;
-
select the tag and press . A checkbox appears next to each detail to assist yous select or deselect it. When selection is finished, press .
-
select the smart group, press and configure a new set of constraints in the Smart Group Editor dialog. This option is besides available in the contextual menu of the smart group.
To remove a tag or a smart group, right-click on it and select the  Remove push button. Note that this does not delete the items grouped in the category.
thirteen.1.1.2. Adding, editing or removing an detail
Every bit seen before, style elements are listed under different tabs whose contents depend on the active category (tag, smart group, favorites…). When a tab is enabled, y'all can:
-
Add new items: printing the
Add item push button and configure the detail following symbols, color ramps or text format and characterization builder description. -
Modify an existing particular: select an item and press
 Edit particular button and configure as mentioned higher up.
 -
Delete existing items: to delete an chemical element you no longer demand, select it and click
Remove item (as well available through right-click). The item volition be deleted from the local database.
Note that the All tab provides access to these options for every type of item.
Right-clicking over a choice of items too allows you lot to:
-
Add together to Favorites;
-
Remove from Favorites;
-
and select the appropriate tag or create a new one to utilise; the currently assigned tags are checked;
-
Clear Tags: detaching the symbols from whatsoever tag;
-
Remove Detail(s);
-
Edit Item: applies to the item y'all right-click over;
-
Copy Item;
-
Paste Item …: pasting to 1 of the categories of the style managing director or elsewhere in QGIS (symbol or color buttons)
-
Export Selected Symbol(s) as PNG… (merely available with symbols);
-
Consign Selected Symbol(south) every bit SVG… (simply available with symbols);
thirteen.ane.1.3. Sharing style items
The  Import/Consign tool, at the left bottom of the Way Director dialog, offers options to hands share symbols, color ramps, text formats and label settings with others. These options are also available through correct-click over the items.
Exporting items
You tin export a prepare of items to an .XML file:
-
Expand the
Import/Export drop-down menu and select  Export Item(s)…
 -
Choose the items you lot'd like to integrate. Option tin can be washed with the mouse or using a tag or a group previously set.
-
Press Export when set. You'll exist prompted to indicate the destination of the saved file. The XML format generates a single file containing all the selected items. This file tin and so exist imported in another user's style library.

Fig. thirteen.3 Exporting mode items
When symbols are selected, you tin too export them to .PNG or .SVG . Exporting to .PNG or .SVG (both not available for other style item types) creates a file for each selected symbol in a given folder. The SVG folder can be added to the SVG paths in menu of another user, allowing him straight access to all these symbols.
Importing items
Y'all can extend your style library past importing new items:
-
Expand the
Import/Export driblet-down bill of fare and select  Import Item(southward) at the left bottom of the dialog.
 -
In the new dialog, signal the source of the way items (it can be an
.xmlfile on the disk or a url). -
Ready whether to
 Add to favorites the items to import.
 -
Check
Do non import embedded tags to avoid the import of tags associated to the items being imported. -
Give the proper name of any Additional tag(southward) to employ to the new items.
-
Select from the preview the symbols you want to add to your library.
-
And printing Import.

Fig. xiii.4 Importing style items
Using the Browser panel
Information technology's likewise possible to import style items into the active user profile style database directly from the Browser panel:
-
Select the style
.xmlfile in the browser -
Elevate-and-drop information technology over the map canvas or right-click and select Import Style…
-
Fill the Import Items dialog following Importing items
-
Press Import and the selected way items are added to the fashion database
Double-clicking the style file in the browser opens the Fashion Managing director dialog showing the items in the file. You can select them and printing Re-create to Default Style… to import them into the active style database. Tags can exist assigned to items. Likewise available through right-click, Open Style… command.

Fig. thirteen.5 Opening a manner items file
The dialog also allows to export single symbols as .PNG or .SVG files.
Using the online repository
The QGIS project maintains a repository with a collection of styles shared past QGIS users. This is available at https://plugins.qgis.org/styles and can exist accessed from the Style Manager dialog, pressing the  Browse Online Styles button at the bottom.
From that repository, y'all tin can:
-
Scan and search for any manner items, based on their type or proper name
-
Download the way file and unzip it
-
Load the
.xmlbased file into your way database in QGIS, using any of the aforementioned import methods.
xiii.1.2. Setting a Color Ramp
The Color ramp tab in the Style Director dialog helps you preview different color ramps based on the category selected in the left panel.
To create a custom color ramp, activate the Color ramp tab and click the Add item button. The button reveals a driblet-down list to choose the ramp type:
-
Slope: given a beginning and end colors, generate a color ramp which can exist continuous or discrete. With double-clicking the ramp preview, you can add as many intermediate color stops as you want.
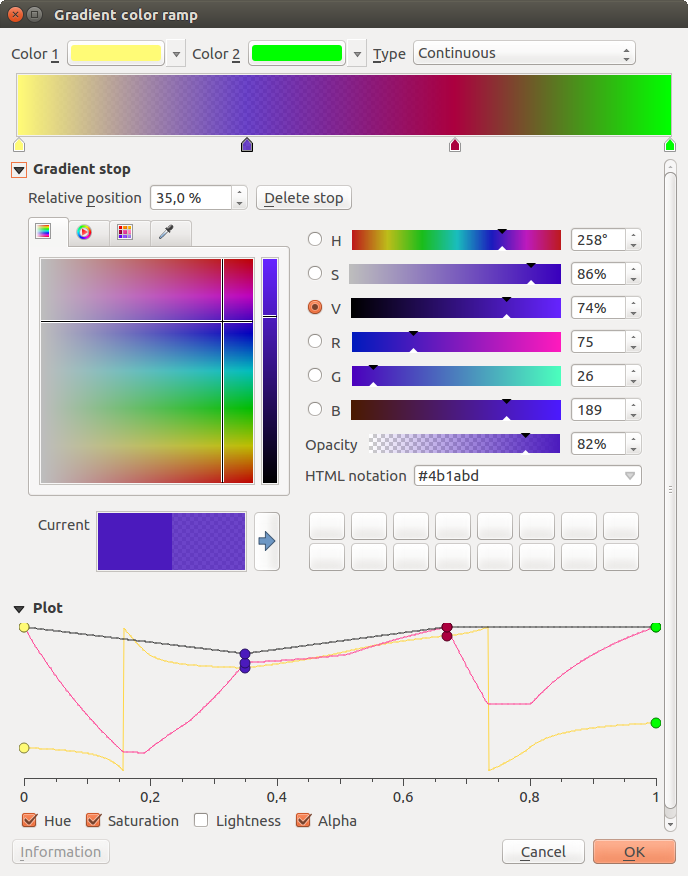
Fig. 13.6 Case of custom slope color ramp with multiple stops
-
Colour presets: allows to create a color ramp consisting of a list of colors selected past the user;
-
Random: creates a random prepare of colors based on range of values for Hue, Saturation, Value and Opacity and a number of colors (Classes);
-
Catalog: ColorBrewer: a set up of predefined detached color gradients yous can customize the number of colors in the ramp;
-
or Catalog: cpt-city: an access to a whole itemize of color gradients to locally salve every bit standard slope. The cpt-city option opens a new dialog with hundreds of themes included 'out of the box'.
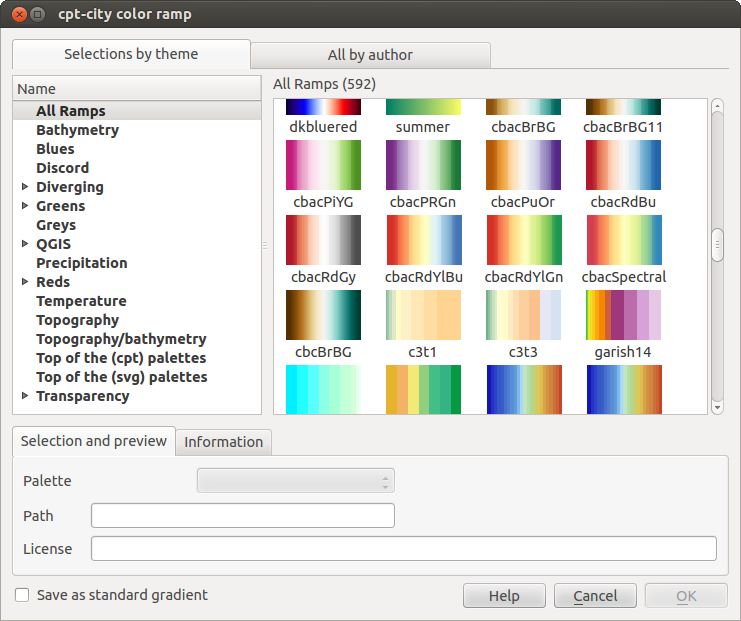
Fig. xiii.7 cpt-city dialog with hundreds of colour ramps
Tip
Easily suit the color stops of the slope color ramp
Double-clicking the ramp preview or drag-and-drop a colour from the colour spot onto the ramp preview adds a new color finish. Each color finish can be tweaked using the Color Selector widgets or by plotting each of its parameters. You can also reposition information technology using the mouse, the arrow keys (combine with Shift key for a larger move) or the Relative position spinbox. Pressing Delete stop too as DEL key removes the selected color finish.
13.ane.3. Creating a Legend Patch Shape
To create a new Legend Patch Shape, activate the Legend Patch Shapes tab and click the Add together item push. The push reveals a drib-down list to choose the geometry type:
-
Marker Legend Patch Shape…: to use with point geometries.
-
Line Fable Patch Shape…: to use with line geometries.
-
Fill Legend Patch Shape…: to employ with polygon geometries.
All 3 options will prove the same dialog.
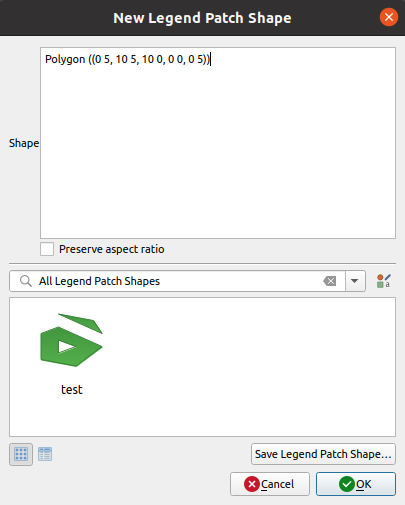
Fig. 13.8 Create a new Legend Patch Shape
Only the shape type and displayed legend patch shapes will differ regarding to the chosen geometry type. The post-obit options volition be available:
-
Shape: define the shape of the legend patch shape as a WKT cord. Unmarried and multipart geometries may be used, but no GeometryCollection.
-
 Preserve attribute ratio
 - Icon View or List View of available fable patch shapes, filtered by tags.
When the new Shape is defined you lot can Relieve Fable Patch Shape… or press OK, which will both lead to the same dialog.
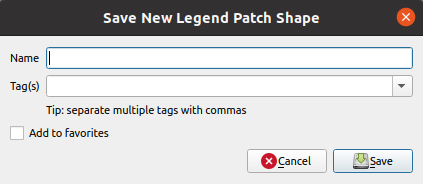
Fig. 13.9 Save a new Legend Patch Shape
Here you have to choose a name, tags to describe the shape and if it should be added to favorites.
If you lot printing Save…, the shape is added to the list and y'all are directed back to the New Legend Patch Shape dialog to keep creating new shapes.

How To Save An Imported Background Layer In Qgis,
Source: https://docs.qgis.org/latest/en/docs/user_manual/style_library/style_manager.html
Posted by: harmonhareand.blogspot.com
0 Response to "How To Save An Imported Background Layer In Qgis"
Post a Comment